Printing from LR

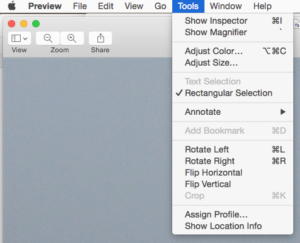
To print from Lightroom you can either  1) use Print tab settings, or 2) Use Export presets

See image below to update LR presets once you make your choices

Print Tab

  1. To use Print tab, first choose the images you want to  print in grid view, then select the Print tab
  2. Use Print tab to choose settings, preview those setting in the man Print window, and then print directly to a linked printer.
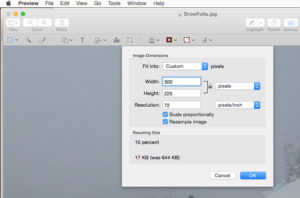
Export Preset

  1. Since you are not linked to the IMRC hi-end printers, we will be exporting your photos in .tiff format to be printed professionally.
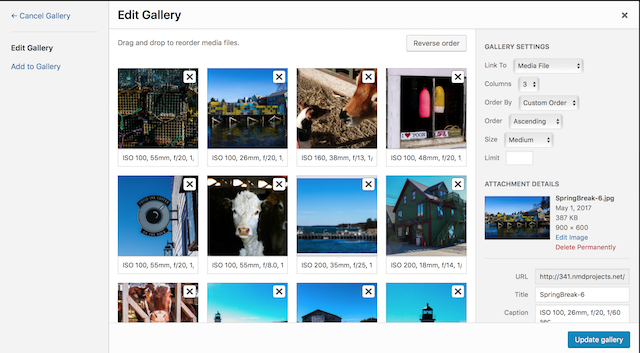
  2. Below is an image with print setting we will use. Choose custom naming for the paper you are using, tif file, Adobe RGB, Set your Longest side to 17″ for printing, and select matte of glossy paper (using the right filename to fit.

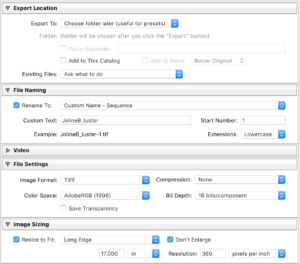
To make sure you’re preset changes work, use “right-click” to “update preset with current settings” as shown below.  When you elect the press after than–it should have the correct settings.

File Name

Name your file as follows:  JolineB1_luster.tif   or JolineB2_Glossy.tif , where luster or glossy set the kind of paper you want for your prints.  A summary of differences are below:

1.Glossy paper is so smooth like glass. Glossy paper is also delicate but has the highest saturation.
2.Lustre paper is a paper with a texture that has small bubbles.
3.Glossy paper has a drawback that it gets dirty easily. If you touch the glossy paper with your dirty fingers, the smear will be shown clearly.
4.Lustre paper does not get dirty that easily.
5.When compared to lustre paper, glossy paper has a high reflective surface.
6.The details are sharper in glossy paper when compared to the details in lustre paper.
7.Colors also look more prominent with glossy paper. The colors are not that prominently exposed when printed on lustre paper.

Read more: Difference Between Glossy and Lustre | Difference Between http://www.differencebetween.net/language/words-language/difference-between-glossy-and-lustre/#ixzz5EDgdptkp

Photo Quotes

photoquotes1

They say a picture is worth a thousand words. But I wonder, what else do “they” say? In order to find out I’ve culled together the best quotes on the subject of photography. I hope they inspire you.

  • “Photography is the story I fail to put into words.”
    Destin Sparks
  • “When words become unclear, I shall focus with photographs. When images become inadequate, I shall be content with silence.”
    Ansel Adams
Photograph by Jennifer Trovato
  • “In photography there is a reality so subtle that it becomes more real than reality.”
    Alfred Stieglitz
  • “There is one thing the photograph must contain, the humanity of the moment.”
    Robert Frank
  • “Taking an image, freezing a moment, reveals how rich reality truly is.”
    Anonymous
  • “Photography is a way of feeling, of touching, of loving. What you have caught on film is captured forever… It remembers little things, long after you have forgotten everything.”
    Aaron Siskind
  • “We are making photographs to understand what our lives mean to us.”
    Ralph Hattersley
  • “A thing that you see in my pictures is that I was not afraid to fall in love with these people.”
    Annie Leibovitz

photoquote2

  • “You don’t take a photograph. You ask quietly to borrow it.”
    Unknown
  • “Photography for me is not looking, it’s feeling. If you can’t feel what you’re looking at, then you’re never going to get others to feel anything when they look at your pictures.”
    Don McCullin
  • “A portrait is not made in the camera but on either side of it.”
    Edward Steichen
  • “It’s one thing to make a picture of what a person looks like, it’s another thing to make a portrait of who they are.”
    Paul Caponigro
  • “The best thing about a picture is that it never changes, even when the people in it do.”
    Andy Warhol
  • “Taking pictures is like tiptoeing into the kitchen late at night and stealing Oreo cookies.”
    Diane Arbus

photoquote3

  • “To me, photography is an art of observation. It’s about finding something interesting in an ordinary place… I’ve found it has little to do with the things you see and everything to do with the way you see them.”
    Elliott Erwitt
  • “The picture that you took with your camera is the imagination you want to create with reality.”
    Scott Lorenzo
  • “If the photographer is interested in the people in front of his lens, and if he is compassionate, it’s already a lot. The instrument is not the camera but the photographer.”
    Eve Arnold
  • “A tear contains an ocean. A photographer is aware of the tiny moments in a persons life that reveal greater truths.”
    Anonymous

photoquote4

  • “The camera is an instrument that teaches people how to see without a camera.”
    Dorothea Lange
  • “Essentially what photography is is life lit up.”
    Sam Abell
  • “I don’t trust words. I trust pictures.”
    Gilles Peress
  • “I really believe there are things nobody would see if I didn’t photograph them.”
    Diane Arbus
  • “Taking pictures is savoring life intensely, every hundredth of a second.”
    Marc Riboud
  • “Once you learn to care, you can record images with your mind or on film. There is no difference between the two.”
    Anonymous
  • “Photograph: a picture painted by the sun without instruction in art.”
    Ambrose Bierce
  • “Photography is truth.”
    Jean-Luc Godard

photoquote5

  • “The camera makes you forget you’re there. It’s not like you are hiding but you forget, you are just looking so much.”
    Annie Leibovitz
  • “If you see something that moves you, and then snap it, you keep a moment.”
    Linda McCartney
  • “There are always two people in every picture: the photographer and the viewer.”
    Ansel Adams
  • “A photograph is a secret about a secret. The more it tells you the less you know.”
    Diane Arbus
  • “The whole point of taking pictures is so that you don’t have to explain things with words.”
    Elliott Erwitt
  • “One doesn’t stop seeing. One doesn’t stop framing. It doesn’t turn off and turn on. It’s on all the time.”
    Annie Leibovitz
  • “What I like about photographs is that they capture a moment that’s gone forever, impossible to reproduce.”
    Karl Lagerfeld

photoquote6

  • “A good photograph is one that communicates a fact, touches the heart and leaves the viewer a changed person for having seen it. It is, in a word, effective.”
    Irving Penn
  • “Beauty can be seen in all things, seeing and composing the beauty is what separates the snapshot from the photograph.”
    Matt Hardy
  • “To me, photography is an art of observation. It’s about finding something interesting an ordinary place… I’ve found it has little to do with the things you see and everything to do with the way you see them.”
    Elliott Erwitt
  • “You don’t take a photograph, you make it.”
    Ansel Adams
  • “When people ask me what equipment I use – I tell them my eyes.”
    Anonymous
  • “I wish that all of nature’s magnificence, the emotion of the land, the living energy of place could be photographed.”
    Annie Leibovitz
  • “I never have taken a picture I’ve intended. They’re always better or worse.”
    Diane Arbus
  • “All photographs are accurate. None of them is the truth.”
    Richard Avedon
  • “Today everything exists to end in a photograph.”
    Susan Sontag
  • “I think good dreaming is what leads to good photographs.”
    Wayne Miller

photoquote7

  • “I love the people I photograph. I mean, they’re my friends. I’ve never met most of them or I don’t know them at all, yet through my images I live with them.”
    Bruce Gilden
  • “If you want to be a better photographer, stand in front of more interesting stuff.”
    Jim Richardson
  • “When I say I want to photograph someone, what it really means is that I’d like to know them. Anyone I know I photograph.”
    Annie Leibovitz
  • “My life is shaped by the urgent need to wander and observe, and my camera is my passport.”
    Steve McCurry
  • “Look and think before opening the shutter. The heart and mind are the true lens of the camera.”
    Yousuf Karsh

photoquote8

  • “The camera is an excuse to be someplace you otherwise don’t belong. It gives me both a point of connection and a point of separation.”
    Susan Meiselas
  • “Most things in life are moments of pleasure and a lifetime of embarrassment; photography is a moment of embarrassment and a lifetime of pleasure.”
    Tony Benn
  • “It is more important to click with people than to click the shutter.”
    Alfred Eisenstaedt
  • “I like to photograph anyone before they know what their best angles are.”
    Ellen Von Unwerth
  • “Great photography is about depth of feeling, not depth of field.”
    Peter Adams
  • “Life is like a camera. Just focus on what’s important and capture the good times, develop from the negatives and if things don’t work out, just take another shot.”
    Unknown

photoquote9

  • “Only photograph what you love.”
    Tim Walker
  • “In photography there are no shadows that cannot be illuminated.”
    August Sander
  • “When I photograph, what I’m really doing is seeking answers to things.”
    Wynn Bullock
  • “Character, like a photograph, develops in darkness.”
    Yousuf Karsh
  • “It’s weird that photographers spend years or even a whole lifetime, trying to capture moments that added together, don’t even amount to a couple of hours.”
    James Lalropui Keivom
  • “Once photography enters your bloodstream, it is like a disease.”
    Anonymous
  • “Which of my photographs is my favorite? The one I’m going to take tomorrow.”
    Imogen Cunningham

About the author: Tammy Jean Lamoureux is a photographer, artist & gypsy based out of Brooklyn, NY and Boston, MA. You can see more of her work on her website. This article was originally published by Curated Quotes here.

Photo Narrative

Most conventional stories have  a beginning, middle and end,  create strong characters and develop a story arc that shows a change in at least one man character.

Most will have the following elements in this order:

  • exposition
  • conflict/crisis
  • climax/turning point
  • resolution

Classical story structure might also  include:

  • location or context
  • character(s), giving the story  a ‘face’
  • let people tell their own story
  • contextualizing those stories
  • use a dramatic form

Most stories depend on a key character/s as a focal point to give the story a personal meaning, some connection to human drama.

For your stories try to answer the following questions:

  • what is the topic or central issue, and what’s at stake?
  • what scenes/ events/moments  will show a crisis/change in a main character?
  • who are the characters and why do we care about them?
  • where and when does the story take place, and what is the context?

You may need to investigate and/or research to understand the story well enough to capture it via photo and then to edit the photos in a series that can convey the story..

Camera Settings

Find and test the following settings:

Camera Operation

_____Memory card & battery
_____On/Of switch
_____Scroll wheel
_____Eyepiece diopter
_____Display screen
_____Shutter release
_____Lens removal button
_____DOF preview
_____Function buttons
_____Autofocus on/of switch
_____Image stabilization switch

Camera Settings

_____Exposure Mode (P, Av, Tv, M,etc.}
_____White Balance (Auto,Daylight,Cloudy,etc.)
_____ISO  (100, 200, 400, 800, etc)
_____Focus Mode (Auto, Manual)
_____Use AFS  for single image
_____Use AFC for moving subject, like sports
_____Focus Point Selection
_____Drive (single, multiple, self-timer)
_____Meter pattern (spor, average, integrated)

Menu Settings

_____Image Quality/File Type (RAW, JPG,etc.)
_____Image Review time (1 ,2, 4, 8  sec )
_____Format (Prepare your memory card for the next set of images)

Carnera Operation

_____Shutter release/exposure  hold/focus hold button
_____Depth of Field Preview
_____Image review activation button (with enlargement)
_____Exposure Compensation (ISO button, or auto)

Canon T5i CheatSheet

By  Julie Adair King, Robert Correll

Your Canon EOS Rebel T5i/700D dSLR camera has so many features that it can be difficult to remember what each control does, especially if you’re new to digital SLR photography. Develop your talents in digital photography by becoming familiar with the external controls and exposure modes on your camera. Print this out, tuck it in your camera bag, and get a head start on taking great photographs!

EXTERNAL CONTROLS ON THE CANON REBEL T5I/700D CAMERA

Get help finding the buttons, dials, and other external controls on your Canon Rebel T5i/700D dSLR digital camera. Recording movies, playing back photos, and choosing shooting modes starts here. The lens shown on the digital camera below is the Canon EF-S 18—55 mm (S (Image Stabilization) model sold with the camera; other lenses may vary.

Have a look at the controls located on the top of the camera:

Here are the buttons and controls on the back of the camera:

A look at what’s on the front of your camera:

Finally, a view of the sides:

EXPOSURE MODE QUICK GUIDE FOR THE CANON REBEL T5I/700D CAMERA

Your Canon Rebel T5i/700D offers the following exposure modes, which you select via the Mode dial on top of the camera. Shooting mode determines how much control you have over exposure, ISO, and aperture. (Modes described as automatic scene modes in the table offer fully automatic photography, but some let you alter color and exposure slightly through the Shoot by Ambience and Shoot by Lighting or Scene Type features.)

Assignment 13

Mini Documentary II

Review Assignment 5—Story Proposal and determine if you want to use the same idea or images from that project.  If so use the steps below to expand your story/documentary.  If you are starting a new project, follow the steps below with your new subject in mind. These projects are created using the free online software Adobe Spark Page.

If you have not yet done so, complete Parts Three & Four.

To embed the Spark Page into WordPress, Select the “Share” link at the top of your Spark project, the select all the “embed code”, then paste this into the TEXT tab of the Post editor, (NOT the Visual tab)–the the upper right of the text entry area.

This should bring up a window with your Spark Page right in your WordPress post.

PART ONE: Focus & Collect

  • Decide on a Focus for your story. Pick a Title. (provisional if necessary)
  • Collect any related media: pictures, drawings, photographs, maps, charts, etc.
  • Organize all your materials in a folder on your desktop.
  • Try to find informational content, which might come from interviews, web sites, articles etc
  • What is the purpose  and audience for your story. Are you trying to inform, convince, provoke, question?

PART TWO: Organize

  • Select the photos you would like to use for your digital story.
  • Select any additional and related images.
  • Draft the narrative you’d like to tell.  What is your main point? How are you leading up to it?  Why will the viewer care? How are the parts of your story laid out. You may want to storyboard if this helps.

PART THREE: Create

  • Clarify the purpose and point of view of your digital story. Revise Title if needed.
  • Begin adding photos, captions, and text to Adobe Spark Page.
  • You can get photos directly from Lightroom, Dropbox, Google Photos or on your desktop right fro Spark Page.

PART FOUR: Revise & Publish

  • Show your digital story to your group and/or class (and/or your original subject)
  • Gather feedback about how the story could be improved, expanded, or updated.
  • Publish stories and show them on New Media Night and on the New Media Website.
  • Share stories with your original subjects.

Assignment 12

Mini Documentary

Review Assignment 5—Story Proposal and determine if you want to use the same idea or images from that project.  If so use the steps below to expand your story/documentary.  If you are starting a new project, follow the steps below with your new subject in mind. These projects are created using the free online software Adobe Spark Page.

Part One & Two are for this week, but feel free to move onto Parts Three & Four.

PART ONE: Focus & Collect

  • Decide on a Focus for your story. Pick a Title. (provisional if necessary)
  • Collect any related media: pictures, drawings, photographs, maps, charts, etc.
  • Organize all your materials in a folder on your desktop.
  • Try to find informational content, which might come from interviews, web sites, articles etc
  • What is the purpose  and audience for your story. Are you trying to inform, convince, provoke, question?

PART TWO: Organize

  • Select the photos you would like to use for your digital story.
  • Select any additional and related images.
  • Draft the narrative you’d like to tell.  What is your main point? How are you leading up to it?  Why will the viewer care? How are the parts of your story laid out. You may want to storyboard if this helps.

PART THREE: Create

  • Clarify the purpose and point of view of your digital story. Revise Title if needed.
  • Begin adding photos, captions, and text to Adobe Spark Page.
  • You can get photos directly from Lightroom, Dropbox, Google Photos or on your desktop right fro Spark Page.

PART FOUR: Revise & Publish

  • Show your digital story to your group and/or class (and/or your original subject)
  • Gather feedback about how the story could be improved, expanded, or updated.
  • Publish stories and show them on New Media Night and on the New Media Website.
  • Share stories with your original subjects.

Assignment 11

Elements Visible & Invisible

Pick one location, and photograph 7 of these 14 elements. Be sure that you create a good number of exposures for each using different angles, or exposure settings, or lenses.  Try to vary your means of capturing images.

Then try to capture at least one element that is usually not visible (i.e. joy, temperature, time, soul, grief, surprise, gravity, magnetism, etc )

  • Color
  • Shape
  • Form
  • Texture
  • Light
  • Shadow
  • Line
  • Size
  • Depth
  • Focus
  • Pattern
  • Negative space
  • Tonality
  • Quality of light

Post your best  image for seven elements in a gallery/slideshow, with a caption indicating the element and your camera settings. Then after your gallery entry describe any patterns or insights about what settings worked best for the elements you were working with.  What did you learn? How might you do it similarly or differently next time? For what effect? What are you learning about your way of seeing and about your cameras capabilities?

Use “Insert Shortcode” button, select “Carousel”, and the following choices:

su_carousel source=”media: 6090,6089,6088,6087″ limit=”4″ link=”lightbox” width=”800″ height=”600″ items=”1″ autoplay=”0″ speed=”100″        NB: the media numbers will appear after you select “media library” then pick your images

Assignment 10

Collections

In preparation for publishing/distributing your work, please create three “collections” in Lightroom:

  1. Web Portfolio
  2. Print
  3. Social Media

Each collection should have at least 5-7 of your best images at this point, though you may add more by the end of April. To do this, you should be continuing to take photos, practicing with the techniques you’ve learned and experimenting with new techniques.

To create collections, you should use “smart collections” by tagging your photos with keywords line “web” “print” and “social media” OR  use colors (6-9), stars (1-5),  and then using these tags or or keywords as criteria for your smart collections.  That way if you add a new photo to  your “Print” collection,  you just have to give it the right tag/keyword.

Be sure to put in only your best photos, and continue to capture images if you need more quality images.

To respond to this post just create 3 galleries (one for each LR collection):

  1. Web Portfolio
  2. Print
  3. Social Media

And then add optimized images of your best photos from each collection into each gallery. You can keep updating this until the end of the semester. I will use it to evaluate your progress over the semester.

If your collections are thin, it’s time to go out and capture more photos!!

See Pete Turner or Nina Hauser for examples

Assignment 9

Panoramas

To Capture the Panorama images:

You’ll need at least two different frames to stitch together to create your panorama, but three to five will give you more to work with, and allow for a much richer image. When capturing these frames make sure to overlap each frame by about 30% or so to allow enough information for the algorithms to match each image with its neighbor.

A few other quick pointers to make it as simple as possible for yourself when you get back to the computer include:

  • Use a tripod to line up each shot, or find some way to keep your capture images steady.
  • Make your settings consistent: Set your white balance, ISO, aperture and shutter speed as consistency between each frame is extremely important.
  • Keep your area of focus consistent through each captured image.
To Create the Panorama:
Import your images to Lightroom
In either Library or Develop, select all the images, then right click and select Photo Merge > Panorama
Adjust the settings and then save your result.
Export ALL your original images, as well as your panorama, and post them–you may want to use a gallery for the initial images, then below place the panorama by itself.

Assignment 8

High Dynamic Range  (HDR) Images

Create a High Dynamic Range image, using regular, under and or-exposed images of the same scene.

Using Google Nik software (which you must install with Lightroom off), within Lightroom, create at least one final HDR image (you can repeat the process and create many versions, say a color and a b/w image.

Export all 4 + images as web sized jpg, and upload to a gallery, with category “Assignment 8”

Assignment 7

Show N Tell

During your Spring Break take your camera with you. Experiment with some of the techniques we have used so far, then import your photos into Lightroom. Make a few minor adjustments and export you favorite set of 5-7 images in a gallery or slideshow. Be sure you note your camera setting in your caption, and any notes you want to share with class.

Those need not be perfect. You may want to show some strange effects that you’d like to explore, or accidents that were lucky.  Take some risks and play a bit. See what happens.

Assignment 6

Story Proposal

Finding a Subject 

Focus your photos this week on possibilities for a photo story or narrative. Explore some options that might give you both good opportunities for visually appealing photos as well as material for a good story.  The story may be easier if it’s non-fiction, and you find a person or team or family or organization that has a story to tell.

Propose  Subject(s)

Propose 2-3 subjects for your story, each with accompanying photos (about 5-7 photos each); as well as a short narrative for each subject.  Your narrative should be 2-3 paragraphs describing the main content of the story, its audience (who would be interested),  and why you think it might be interesting for your audience.

Post your 2-3 galleries with a Story Title above the gallery/slideshow, and the text description beneath each one. Then use a horizontal rule to divide each section as below

For galleries use the following settings  (you may use Size: Large as the photos will scale for the browser window and this will fill the window):


We will review your story ideas before you leave for break so you can continue work on them if you choose.

Post settings:

  • Post Title: Assignment 6_FirstL  ( First=first name, L=last name initial)
  • Post format: Standard
  • Post category: Assignment 6

DUE MAR 6

Some sources for how to create a photo narrative:

Assignment 5

Lightroom Workflow

Workflow & Import 

Create a workflow process in Lightroom that allows you to quickly organize, process and export images so that you can get your work out into the world quickly and efficiently. Create an Import “preset” for importing images, and then use P (pick) U (unpick), or X (reject) to quickly sort through your photos. Use color labels (6-9) and star ratings (1-5) to sort your favorites, or special  edits. You may also want to create Regular and Smart collections so you can view your sets of images easily. I like to create smart collections that have 4+ stars, and also 5 stars, as well as ones that have particular labels like “all red label photos–which may be my color code for landscapes.

Processing

Open the histogram window and use it to guide your setting adjustments.  Using the Crop tool, and the Basic settings (and more if you are already comfortable with them), to alter your images to improve composition, exposure, detail, clarity and tone.  You may choose to make  them more realistic or more artful. Have a goal in mid when you process, as it can be tricky to simple aim for the best photo–there are many ways to get the best photo (e.g. b/w, natural, painterly, surreal, etc.)

Export & Gallery

Create an Export preset with the following settings:  name your files with your full name, followed by sequence number, set resolution to 72 dpi, shortest side length to 600, and file type to jpg, with max file size 400k.  Export the before and after images as jpgs and post them in a gallery with captions in the class WordPress. Select 10 images that show a variety of techniques or effects that you tried. Your aim should be producing good photos, but you may also include experiments that just taught you something you value.

Use the “AddTwenty20” button above to select your before and after photos for inserting into post.

Example:

Post settings:

  • Post Title: Assignment 5_FirstL  ( First=first name, L=last name initial)
  • Post format: Standard
  • Post category: Assignment 5

DUE TUES FEB 28

Assignment 4

Creative Shutter Speed

Practice using Shutter Priority mode (Tv or S) on your camera to control shutter speed.

Motion capture

Choose at least 3 moving subjects–water, ball rolling, object falling, animal, person, plant in the wind, etc. Try a photo at slow (use tripod if you can), medium and fast shutter speeds. Use the chart below from Camera Exposure: Aperture, ISO & Shutter Speed to help you assess what shutter speed you will need to create the effect you are looking for.


Post your3 sets of 3 subjects (9 photos) photos in a slideshow .

Post settings:

  • Post Title: Assignment 4_FirstL  ( First=first name, L=last name initial)
  • Post format: Standard
  • Post category: Assignment 4
Creative effects (optional)

Try using shutter speed to create other effects besides capturing motion. See Using Camera Shutter Speed Creatively for tips and suggestions.

If you are able to create an interesting effect in these photos you may add a few to your slideshow—use captions to describe your technique and or subject.

Lightroom Catalogue

In addition, you should be adding all your photos to your Lightroom catalogue. This will allow you to make changes to your photos and export jpg from the raw format you should be using when you create your photos.  See Workflow—Import, Organize, Edit/Develop, Export, Publish for tips and suggestions.

Review Criteria

When reviewing photos and providing feedback to your classmates, consider the following attributes of photography. While you need not exhaust this list, choosing a few specifics from the list below and specifying how the photo address those attributes, will be much more useful than a general supporting response.

Content
  • Meaning
  • Subject 
  • Emotion/Empathy
  • Mood/Atmosphere
  • Symbolism, Irony, Resonance
  • Timing
  • Truthfulness or Authenticity
  • Uniqueness (does it conform to or break a stereotype?)
Composition
  • Point of View
  • Framing
  • Background/Foreground
  • Design
  • Visual impact
Technique
  • Exposure
  • Depth of field
  • Focus
  • Clarity/sharpness
  • Color & tones
  • Contrast
  • Lighting
Aesthetics
  • Creativity
  • Originality
  • Special effects—natural or digital
  • (smoke, night, fog, movement etc)

Optimize Images

Duplicate the image you are using, save the original if you need it and shrink the copy.

Rename the copy to a suitable name, then open it in  Preview on mac (or similar software on PC).

Select Adjust Size from the Tool Menu:

Then with both blue boxes clicked, and the dropdown next to width & height set to “pixels”, set the largest edge of your image to 800 (the other will change automatically). For example if your width =1600 and your height=1200, the width will default to 600).

Make sure the resolution is set to 72.

Save image–it is now ready to upload to your post.

You can use a gallery like the one below by selecting the Gallery option when you insert media into your post via “Add Media” button.

Assignment 3

Review all of your classmates photos for both Assignment 1 and Assignment 2.

In the Comment section of the posts, leave feedback for at least 4  classmates (2 for each assignment) following the Review Criteria posted in the Guides section.

Copy the classmates posts URL, and your feedback for each of your 4 posts into a post with category 2b

Assignment 2

GETTING COMFORTABLE PHOTOGRAPHING STRANGERS (due next Tues)
Bring or Rent a DSLR camera to Thursday class!!

Use the UMaine campus as a setting for street photography techniques. You can borrow a DSLR camera or use a smartphone or iPad for this assignment.

In street photography, often the fear of rejection is worse than the rejection itself, so practice asking, and practice dealing with rejection.

To build your confidence, try the “5 yes, 5 no” challenge.

Approach a bunch of strangers and ask for permission to make their portrait. You have to keep asking until you get 5 people to say “yes” and 5 people to say “no.”

You will discover it is harder to get a “no” than a “yes”.

If you’ve got all 5 “yes’s” but not 5 “no’s” — you need to purposefully go out and look for the scariest people you think will say “no.”

Also try to frame your photos in different ways–POV, angle, subject (just feet?). Try to vary your techniques. Bring all photos to class for review/discussion. Take risks, don’t be afraid to create unusual or even ‘bad’ photos in an attempt to learn something or be creative. Your task is not perfection, but experimentation & learning.

Basic Camera Settings:

  • Focus mode Servo or Continuous
    Setting the camera to Servo or Continuous focusing mode will allow you to capture moving and static subjects effectively.
  • Shutter speed 1/125sec or faster
  • Aperture f/5.6
  • ISO 400
  • Lens 18mm to 200mm
  • Drive mode Single or Continuous
  • White balance Auto
Purpose:

The purpose of this assignment is to help you face rejection. In life, photography, and everything else — we are slaves of fear. This will help you face your fear head-on.

Uploading photos:

  • Use jpg image ( set camera to raw + jpeg until you learn to export jpg in Lightroom)
  • Use Preview (on Mac) Irfanview or Xnview (for PC)
  • Max image size for length or width= 1024 px;
  • Max file size = 400K
  • Max resolution 72dpi

Post settings:

  • Post Title: Assignment 2_FirstL  ( First=first name, L=last name initial)
  • Post format: Standard
  • Post category: Assignment

Assignment 1

WHAT ELSE THERE IS TO SEE (due next Tuesday)
Bring or Rent a DSLR camera to Thursday class!!

Go to any familiar place–street, restaurant, forest path, etc.  Pick five different spots, and from each spot (the size of a hula-hoop), create as many photos as you need to in order to realize 5 satisfactory photos. You’re look for an unusual angle, composition, color, movement, moment, gesture, etc.

You should end up with five good photos from each “spot”, then arrange the five best photos from these 25 into a carousel with image height 300.

Uploading photos:

  • Use jpg image ( set camera to raw + jpeg until you learn to export jpg in Lightroom)
  • Use Preview (on Mac) Irfanview or Xnview (for PC)
  • Max image size for length or width= 1024 px;
  • Max file size = 400K
  • Max resolution 72dpi

Post settings:

  • Post Title: Assignment 1_FirstL  ( First=first name, L=last name initial)
  • Post format: Standard
  • Post category: Assignment


Curtis Near

I had only ever seen Stefano cry a few times that I can remember. Once was when he was seven and he crashed his bike into a tree and broke his wrist. A second was when he was ten—maybe eleven and he said he was so tired of his parents screaming at each other and throwing things around the house. The last time I saw my best friend cry was when his dog died two years ago. The kid didn’t even cry when his parents finally separated. He was relieved, if anything. But this was different. He had finally broken too.

Curtis Far

I had only ever seen Stefano cry a few times that I can remember. Once was when he was seven and he crashed his bike into a tree and broke his wrist. A second was when he was ten—maybe eleven and he said he was so tired of his parents screaming at each other and throwing things around the house. The last time I saw my best friend cry was when his dog died two years ago. The kid didn’t even cry when his parents finally separated. He was relieved, if anything. But this was different. He had finally broken too.